Posted by Marco Minerva
In this post, I’ll show how to control a Relay module using a Windows Phone app that is able to remotely turn on or off a light. (See also: Voice controlled home automation using Arduino)
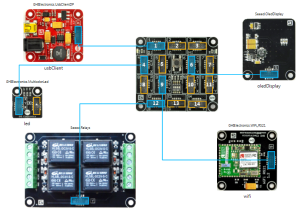
Let’s start creating a new Gadgeteer application. Connect the following modules to a FEZ Spider Mainboard:
- USB ClientDP;
- WiFi RS21, to allow connections to the device;
- Multicolor LED, to indicate device status;
- OLED Display, to show the IP Address of the device;
- Relay (the most important), that allows to create a swith controlled by .NET Gadgeteer.
The resulting system is shown in the following screenshot.
Now, we must attach a light to the Relay module, so that we can turn it on or off from our Gadgeteer device application. The following image recalls how relay works:
So, we can create a simple circuit connecting a battery pack to a light and to the Relay module, as you can see in the next image.
Our hardware is ready, it’s time to write code. First of all, we need to connect the device to the network using the Wi-Fi module. This task is performed in the ProgramStarted method:
private const string SSID = "YOUR_NETWORK_SSID";
private const string PASSPHRASE = "YOUR_NETWORK_PASSPHRASE";

void ProgramStarted()
{
    led.GreenBlueSwapped = true;
    led.BlinkRepeatedly(GT.Color.Blue);

    Gadgeteer.Modules.GHIElectronics.WiFi_RS21.WiFiNetworkInfo info = new WiFi_RS21.WiFiNetworkInfo();
    info.SSID = SSID;
    info.SecMode = WiFi_RS21.SecurityMode.WPA2;
    info.networkType = WiFi_RS21.NetworkType.AccessPoint;

    wifi.NetworkUp += new GTM.Module.NetworkModule.NetworkEventHandler(wifi_NetworkUp);

    wifi.UseDHCP();
    wifi.Join(info, PASSPHRASE);
}
Before actually setting the connection, we make the led blink, to notify that the device initialization is in progress. Note that my Multicolor LED has the green and blue color swapped, so I need to set the GreenBluetSwapped property to true in order to show the correct color.
Next, we configure the Wi-Fi module. We create a WiFiNetworkInfo object in which we specify the SSID, the security mode and the network type. You can find more details about this configuration in the module documentation. Then, we call the UseDHCP method and we join the network. When the network is available, the NetworkUp event is raised, in which we set the web events that manage the switch:
private const string GET_SWITCH = "get_switch";
private const string SET_SWITCH = "set_switch";
private const string SWITCH_STATUS = "switch_status";

void wifi_NetworkUp(GTM.Module.NetworkModule sender,
                                             GTM.Module.NetworkModule.NetworkState state)
{
    oledDisplay.SimpleGraphics.Clear();
    oledDisplay.SimpleGraphics.DisplayText(wifi.NetworkSettings.IPAddress,
        Resources.GetFont(Resources.FontResources.NinaB), GT.Color.Yellow, 15, 50);

    // Create the services to manage the switch.
    var setSwitchEvent = WebServer.SetupWebEvent(SET_SWITCH);
    setSwitchEvent.WebEventReceived +=
                                new WebEvent.ReceivedWebEventHandler(switchEvent_WebEventReceived);

    var getSwitchEvent = WebServer.SetupWebEvent(GET_SWITCH);
    getSwitchEvent.WebEventReceived +=
                                new WebEvent.ReceivedWebEventHandler(switchEvent_WebEventReceived);

    WebServer.StartLocalServer(wifi.NetworkSettings.IPAddress, 80);
    led.TurnGreen();
}
First, we show the assigned IP address on the display, so that our Windows Phone Application will know where to connect. Then, we create two events:
- the first on path set_switch, to set the switch status (on or off, as described later);
- the second on path get_switch, to get the current status of the switch.
Finally, we start the Web Server and we turn the led green. When a request arrives to one of this path, the WebEventReceived event is raised:
private void switchEvent_WebEventReceived(string path, WebServer.HttpMethod method, Responder responder)
{
    switch (path.ToLower())
    {
        case SET_SWITCH:
            var mode = responder.GetParameterValueFromURL("mode").ToLower();
            if (mode == "on")
                relays.Relay1 = true;
            else
                relays.Relay1 = false;

            responder.Respond(SWITCH_STATUS + ": " + relays.Relay1.ToString());
            break;

        case GET_SWITCH:
            responder.Respond(SWITCH_STATUS + ": " + relays.Relay1.ToString());
            break;
    }
}
If a request comes for the set_switch path, we use the GetParameterValueFromURL method to get the query string value of the mode parameter. If it is on, we set the Relay1 property to true, closing the circuit: in this way, we turn the light on. If, instead, the value is different from on, we set the Relay1 property to false, opening the circuit and then turning the light off. After that, we use the Respond method to send a response back to the client, with the current relay status.
When the device receives a request for get_switch, it simply returns the current switch status.
So, the device is able to manage request of the following types:
- http://IP_ADDRESS/set_switch?mode=on (to turn the light on)
- http://IP_ADDRESS/set_switch?mode=off (to turn the light off)
- http://IP_ADDRESS/get_switch (to get switch status)
In all cases, the response is a string in the form switch_status: true|false.
Finally, the complete Program.cs file follows:
private const string SSID = "YOUR_NETWORK_SSID";
private const string PASSPHRASE = "YOUR_NETWORK_PASSPHRASE";

private const string GET_SWITCH = "get_switch";
private const string SET_SWITCH = "set_switch";
private const string SWITCH_STATUS = "switch_status";

void ProgramStarted()
{
    led.GreenBlueSwapped = true;
    led.BlinkRepeatedly(GT.Color.Blue);

    Gadgeteer.Modules.GHIElectronics.WiFi_RS21.WiFiNetworkInfo info = new WiFi_RS21.WiFiNetworkInfo();
    info.SSID = SSID;
    info.SecMode = WiFi_RS21.SecurityMode.WPA2;
    info.networkType = WiFi_RS21.NetworkType.AccessPoint;

    wifi.NetworkUp += new GTM.Module.NetworkModule.NetworkEventHandler(wifi_NetworkUp);

    wifi.UseDHCP();
    wifi.Join(info, PASSPHRASE);
}

void wifi_NetworkUp(GTM.Module.NetworkModule sender,
                                             GTM.Module.NetworkModule.NetworkState state)
{
    oledDisplay.SimpleGraphics.Clear();
    oledDisplay.SimpleGraphics.DisplayText(wifi.NetworkSettings.IPAddress,
        Resources.GetFont(Resources.FontResources.NinaB), GT.Color.Yellow, 15, 50);

    // Create the services to manage the switch.
    var setSwitchEvent = WebServer.SetupWebEvent(SET_SWITCH);
    setSwitchEvent.WebEventReceived +=
                                new WebEvent.ReceivedWebEventHandler(switchEvent_WebEventReceived);

    var getSwitchEvent = WebServer.SetupWebEvent(GET_SWITCH);
    getSwitchEvent.WebEventReceived +=
                                new WebEvent.ReceivedWebEventHandler(switchEvent_WebEventReceived);

    WebServer.StartLocalServer(wifi.NetworkSettings.IPAddress, 80);
    led.TurnGreen();
}

private void switchEvent_WebEventReceived(string path, WebServer.HttpMethod method, Responder responder)
{
    switch (path.ToLower())
    {
        case SET_SWITCH:
            var mode = responder.GetParameterValueFromURL("mode").ToLower();
            if (mode == "on")
                relays.Relay1 = true;
            else
                relays.Relay1 = false;

            responder.Respond(SWITCH_STATUS + ": " + relays.Relay1.ToString());
            break;

        case GET_SWITCH:
            responder.Respond(SWITCH_STATUS + ": " + relays.Relay1.ToString());
            break;
    }
}
And here it is the assembled device:
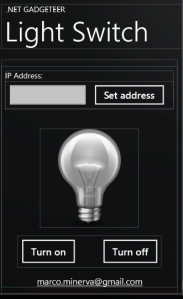
Now, let’s see the Windows Phone counterpart. Create a Windows Phone Application and place the following code in the MainPage.xaml file:
<!--TitlePanel contains the name of the application and page title-->


<!--ContentPanel - place additional content here-->
You can find the images ligth_on.png and light_off.png in the ZIP file that is available at the end of the article. The UI of the application should be like the following:
Now, we need to write the code to communicate with the .NET Gadgeteer device. As the device exposes its functionalities using the standard WebEvent mechanism, that is accessible via HTTP, we’ll use RestSharp to simplify the task. We can add it to the project using NuGet (just search RestSharp).
Here is the code of the MainPage.xaml.cs file:
public partial class MainPage : PhoneApplicationPage
{
    private IPAddress address;

    // Constructor
    public MainPage()
    {
        InitializeComponent();
    }

    private void btnSetIPAddress_Click(object sender, RoutedEventArgs e)
    {
        if (string.IsNullOrWhiteSpace(txtIPAddress.Text)
            || !IPAddress.TryParse(txtIPAddress.Text, out address))
        {
            MessageBox.Show("Invalid IP Address.");
        }
        else
        {
            this.GetSwitchStatus();
        }
    }

    private void btnSwitchOn_Click(object sender, RoutedEventArgs e)
    {
        // Sends command to turn-on the switch.
        this.SetSwitchStatus(true);
    }

    private void btnSwitchOff_Click(object sender, RoutedEventArgs e)
    {
        // Sends the command to turn-off the switch
        this.SetSwitchStatus(false);
    }

    private void GetSwitchStatus()
    {
        // Sends the command to query for switch status.
        this.SendRequest("/get_switch");
    }

    private void SetSwitchStatus(bool on)
    {
        string requestUrl = string.Format("/set_switch?mode={0}", on ? "on" : "off");
        this.SendRequest(requestUrl);
    }

    private void SendRequest(string requestUrl)
    {
        if (address != null)
        {
            // Creates the request using RESTSharp.
            RestClient client = new RestClient("http://" + address.ToString());
            RestRequest request = new RestRequest(requestUrl, Method.GET);
            client.ExecuteAsync(request, response =>
            {
                if (response.StatusCode == HttpStatusCode.OK)
                {
                    // Processes the response.
                    var data = response.RawBytes;
                    var responseString = System.Text.Encoding.UTF8.GetString(data, 0, data.Length);
                    var isOn = Convert.ToBoolean(
                        responseString.Substring(responseString.IndexOf(":") + 1).Trim());
                    string imgPath = isOn ? "Images/light_on.png" : "Images/light_off.png";
                    imgLight.Source = new BitmapImage(new Uri(imgPath, UriKind.Relative));
                }
                else
                {
                    MessageBox.Show("Error during the request.");
                }
            });
        }
    }
}
In the btnSetIPAddress_Click method, we first check if the IP address inserted in the TextBox is correct. In this case, we get the current switch status, using the GetSwitchStatus method, which in turn calls SendRequest on the /get_switch resource.
The SendRequest method realizes the real work. We create a RestClient object that points to the IP address we previously set, then we instantiate a RestRequest class, using the specified request URL and the HTTP GET method.
The request is sent to the device using the ExecuteAsync method, that is executed in background. When it completes, the action specified as second parameter is called: we check if it succeeds and then we examinate the response. As we said earlier, it contains a simple boolean value telling if the light is on or off. We use this value to determine the image to use in the UI.
When we press the Turn on or Turn off button, we create a request on the /set_switch resource, setting the mode parameter according to the pressed button (on or off, respectively).
Both the Gadgeteer and the Windows Phone application are available for download.


#1 by Tom Ceuppens (@KyorCode) on July 24, 2012 - 4:34 AM
I’m curious, which parts remain required to run the switch independently?
My guess is :
– Relay
– Led
– Wifi
– SpiderBoard
The USB and LED are just to get info and to program the whole thing?
#2 by Marco Minerva on July 24, 2012 - 5:45 AM
LED is optional, but you need the USB Client DP module in order to connect a power source to Gadgeteer board.
#3 by Tom Ceuppens (@KyorCode) on July 24, 2012 - 5:56 AM
Mmm, I’m just in search of an easy system to control all my lightswitches through wifi, preferably cheap. Any change you might point me into a direction?
#4 by Marco Minerva on July 24, 2012 - 6:04 AM
Are you searching for something existing, or do you want to develop your own system?
#5 by Tom Ceuppens (@KyorCode) on July 24, 2012 - 6:11 AM
Either, I pretty comfortable in .NET #, but don’t mind doing it in other languages.
#6 by Marco Minerva on July 24, 2012 - 6:18 AM
How many switches do you want to control? And they are near each other? Otherwise, instead of .NET Gadgeteer, you probably should take a look to Home Automation argument: http://en.wikipedia.org/wiki/Home_automation.
#7 by Tom Ceuppens (@KyorCode) on July 24, 2012 - 6:40 AM
around 30 switches I think. Wikipedia, why didn’t I think of that -.- .. *feeling stupid* I guess it’s time to digg up my electronics courses again :p – big thanks for the info!
#8 by Marco Minerva on July 24, 2012 - 6:42 AM
You’re welcome 🙂
#9 by Arpit Mehta on May 6, 2013 - 12:06 AM
Is there any other relay module that can be used as this one has been discontinued 😦
#10 by Michael Dodaro on May 6, 2013 - 6:47 AM
This module was available from Seeed Studios. If GHI Electronics isn’t selling it anymore, try http://www.seeedstudio.com/depot/relay-module-net-gadgeteer-compatible-p-967.html
#11 by Arpit Mehta on May 12, 2013 - 12:45 AM
thanks!
#12 by navnnet agarwal on November 7, 2013 - 6:30 AM
i want to make a project in which light switches can be operated using phone and light can be on and off frm anywhere??
#13 by Michael Dodaro on November 7, 2013 - 7:49 AM
See this post: http://wp.me/p1TEdE-jF I’ve used this model to control lights and other appliances from anywhere with my phone.