Posted by Marco Minerva
In this post, I’ll show how to construct a robot with .NET Gadgeteer and how to control it using a Bluetooth connection from a PC application based on the 32feet.NET library.
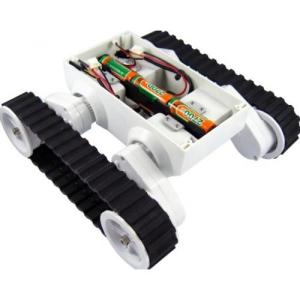
Let’s start from .NET Gadgeteer part. The base of our robot is the Rover 5 Tank Chassis, that provides two motors that can be easily controlled by the Motor Driver L298 Module.
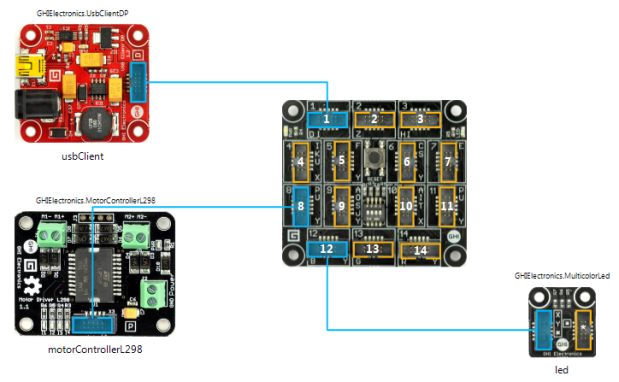
For our Gadgeteer application, we use a Multicolor LED, to show the status of the robot, the Motor Driver L298 and the Bluetooth Module, as you can see in the following screenshot.
Note that we don’t add the Bluetooth module to the Designer because we use the beta driver implemented by Eduardo Velloso. Download the driver from CodePlex and add the Bluetooth.cs file to your project (you can find it in the download code available at the end of this post). Connect the module to socket 9.
Now we can open the Program.cs file and write the initialization code:
private Bluetooth bluetooth;
private Bluetooth.Client client;

private GT.Timer bluetoothMovementTimer;

void ProgramStarted()
{
    led.GreenBlueSwapped = true;
    led.BlinkRepeatedly(GT.Color.Blue);

    motorControllerL298.MoveMotor(MotorControllerL298.Motor.Motor1, 0);
    motorControllerL298.MoveMotor(MotorControllerL298.Motor.Motor2, 0);

    bluetooth = new Bluetooth(9);
    client = bluetooth.ClientMode;
    bluetooth.SetDeviceName("Gadgeteer");
    bluetooth.SetPinCode("1234");
    bluetooth.DataReceived += new Bluetooth.DataReceivedHandler(bluetooth_DataReceived);
    client.EnterPairingMode();

    bluetoothMovementTimer = new GT.Timer(500);
    bluetoothMovementTimer.Tick += new GT.Timer.TickEventHandler(bluetoothMovementTimer_Tick);
    bluetoothMovementTimer.Start();

    led.TurnGreen();

    // Use Debug.Print to show messages in Visual Studio's "Output" window during debugging.
    Debug.Print("Program Started");
}
At startup, you make the Multicolor LED blink, so that we have a visual hint of what is happening. Note that I have used the line led.GreenBlueSwapped = true because my module has a firmware bug which inverts these colors. If you don’t have this problem, you can remove this line.
Then, we stop the motors, to be sure to correctly initialize the system, and we configure the Bluetooth module. We set Gadgeteer as device name and we configure a PIN code. We attach an event handler of the DataReceived event and we enter the pairing mode, making the device discoverable.
After that, we initialize a timer object that is used to control the motors movement and, finally, we set the LED color to green, meaning that the system is read to use.
Now, we need to write code in the DataReceived and Tick event handlers, respectively, to check the received commands and to perform movements based on them. But, first of all, we need to declare some variables to handle device status. So, write these instructions before the ProgramStarted method:
private enum Status
{
    Idle, Ahead, Back, TurnRight, TurnLeft, Rotate
}

private Status currentStatus;
private Status newStatus;

private enum RoverDirection
{
    None = 0,
    Ahead = 1,
    Back = 2,
}

private RoverDirection roverDirection;
The first enum, Status, specifies the current “situation” of the Rover, i.e. if it is idle, if it is going forward, backword, and so on. The next variables store the current status and the new status that is received via Bluetooth. Similary, RoverDirection contains a value that tells if the Rover is going forward or backward. We need this information because, when we make the rover turn, and so we specify a new Status, we must keep the current movement direction, so that the Rover turns in the right direction.
Now we can write the code to handle the commands that are received via Bluetooth:
private void bluetooth_DataReceived(Bluetooth sender, string data)
{
    switch (data.ToUpper())
    {
        case "A":
            newStatus = Status.Ahead;
            roverDirection = RoverDirection.Ahead;
            break;

        case "B":
            newStatus = Status.Back;
            roverDirection = RoverDirection.Back;
            break;

        case "S":
            newStatus = Status.Idle;
            roverDirection = RoverDirection.None;
            break;

        case "T":
            newStatus = Status.Rotate;
            break;

        case "R":
            newStatus = Status.TurnRight;
            break;

        case "L":
            newStatus = Status.TurnLeft;
            break;

        default:
            break;
    }
}
We simply associate each movement with a character: if we received A, the Rover goes forward, with B it goes backward, and so on. For each character, we set the newStatus and roverDirection variables accordingly. This piece of code is quite self-explanatory.
Finally, in the timer Tick event, we write the code to actually move the Rover, using the newStatus and roverDirection we have set in the DataReceveid event:
void bluetoothMovementTimer_Tick(GT.Timer timer)
{
    if (currentStatus != newStatus)
    {
        timer.Stop();

        int speed = 50;
        int currentDirection1 = 0;
        int currentDirection2 = 0;

        switch (newStatus)
        {
            case Status.Idle:
                currentDirection1 = currentDirection2 = 0;
                break;

            case Status.Ahead:
                currentDirection1 = currentDirection2 = 1;
                break;

            case Status.Back:
                currentDirection1 = currentDirection2 = -1;
                break;

            case Status.TurnRight:
                speed = 100;
                currentDirection1 = 0;
                if (roverDirection == RoverDirection.Ahead)
                    currentDirection2 = 1;
                else if (roverDirection == RoverDirection.Back)
                    currentDirection2 = -1;
                break;

            case Status.TurnLeft:
                speed = 100;
                currentDirection2 = 0;
                if (roverDirection == RoverDirection.Ahead)
                    currentDirection1 = 1;
                else if (roverDirection == RoverDirection.Back)
                    currentDirection1 = -1;
                break;

            case Status.Rotate:
                speed = 100;
                currentDirection1 = 1;
                currentDirection2 = -1;
                break;

            default:
                break;
        }

        motorControllerL298.MoveMotor(MotorControllerL298.Motor.Motor1, speed * currentDirection1);
        motorControllerL298.MoveMotor(MotorControllerL298.Motor.Motor2, speed * currentDirection2);

        currentStatus = newStatus;
        timer.Start();
    }
}
If currentStatus is different from newStatus, we must control what movement must be performed. So, first we set the speed variable to 50, meaning that we want the Rover move to half of its maximum velocity. Then, we declare two variables that holds the motor direction: a positive value means forward movement, while a negative one means backward. We set these variables accordingly to the newStatus variable. Note that, in case of turn left, right, or rotate, we set the speed to 100, so that the Rover moves faster. Finally, we call the MoveMotor method to change the movement of each motor, using the calculated speed and direction.
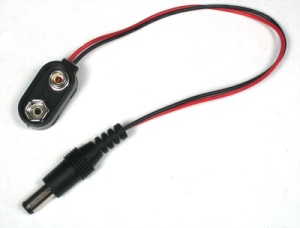
Our application is ready, now we can assemble it. To place all the modules on the Rover, I have adapted an old 5,25” floppy enclosure. It isn’t very elegant, but it sufficient for our needs. Moreover, to provide power to the .NET Gadgeteer board, I have used a 9v battery clip like the following one.
In conclusion, after a bit of work, our robot looks like the following:
Now it’s the turn of the PC application that will control the Rover using the Bluetooth interface. Let’s create a WPF Application and write the following XAML in the MainWindow.xaml file:
<Window x:Class="BluetoothRoverControl.MainWindow"
        xmlns="http://schemas.microsoft.com/winfx/2006/xaml/presentation"
        xmlns:x="http://schemas.microsoft.com/winfx/2006/xaml"
        Title="Bluetooth Rover Control"
        Width="560" MinWidth="560" Height="700" MinHeight="700"
        PreviewKeyDown="Window_PreviewKeyDown" PreviewKeyUp="Window_PreviewKeyUp"
        WindowStartupLocation="CenterScreen"
        Icon="/BluetoothRoverControl;component/Images/bluetooth.png">
    <Grid Background="WhiteSmoke">
        <Grid.RowDefinitions>
            <RowDefinition Height="Auto"></RowDefinition>
            <RowDefinition Height="Auto"></RowDefinition>
            <RowDefinition Height="*"></RowDefinition>
            <RowDefinition Height="Auto"></RowDefinition>
        </Grid.RowDefinitions>
        <TextBlock Text="Bluetooth Rover Control" FontSize="20" FontWeight="Bold" Margin="10"
                   Grid.Row="0"></TextBlock>
        <StackPanel Orientation="Horizontal" Grid.Row="1">
            <TextBlock Margin="10" Text="Status:" VerticalAlignment="Center"></TextBlock>
            <TextBlock x:Name="lblStatus" Width="250" VerticalAlignment="Center"
                       HorizontalAlignment="Left" FontWeight="Bold"></TextBlock>
            <Button x:Name="btnSearchRover" Content="_Search Rover"
                    HorizontalAlignment="Left" VerticalAlignment="Center"
                     Height="25"
                    Padding="10 0 10 0" Click="btnSearchRover_Click"></Button>
        </StackPanel>
        <DockPanel LastChildFill="True" Grid.Row="2">
            <Image x:Name="upImage" Source="Images/up.png" DockPanel.Dock="Top"
                   Height="80" Margin="10"></Image>
            <Image x:Name="downImage" Source="Images/down.png" DockPanel.Dock="Bottom"
                   Height="80" Margin="10"></Image>
            <Image x:Name="leftImage" Source="Images/left.png" DockPanel.Dock="Left"
                   Height="80" Margin="10"></Image>
            <Image x:Name="rightImage" Source="Images/right.png" DockPanel.Dock="Right"
                   Height="80" Margin="10"></Image>
            <Image Source="Images/Rover.jpg"></Image>
        </DockPanel>
        <TextBlock Grid.Row="3" HorizontalAlignment="Right" Margin="20 20 20 5" FontSize="14">
            Realized by Marco Minerva,
            <Hyperlink NavigateUri="mailto:marco.minerva@gmail.com" TargetName="_top">
                marco.minerva@gmail.com
            </Hyperlink>
        </TextBlock>
    </Grid>
</Window>
You can find all the images in the ZIP file at the end of this post. The application UI will appear as in the following screenshot. The arrow keys are visual indicators that show what keys are pressed and, accordingly, what is the direction of the Rover.
To handle Bluetooth connection, we use 32feet.NET library. You can download it from http://32feet.codeplex.com/ or, if you use NuGet, you can find it simply searching Bluetooth.
After adding a reference to the library, we need to declare and initialize some variables that will be used in the program:
private enum RoverDirection
{
    None = 0,
    Ahead = 1,
    Back = 2,
}

private RoverDirection roverDirection;

private Dictionary keyCommands;
private Dictionary keyPressedStatus;

private BluetoothClient client;
private Stream bluetoothStream;

public MainWindow()
{
    InitializeComponent();

    keyCommands = new Dictionary();
    keyCommands.Add(Key.Up, "A");
    keyCommands.Add(Key.Down, "B");
    keyCommands.Add(Key.Left, "L");
    keyCommands.Add(Key.Right, "R");
    keyCommands.Add(Key.T, "T");

    keyPressedStatus = new Dictionary();
    foreach (var key in keyCommands.Keys)
        keyPressedStatus[key] = false;

    if (!BluetoothRadio.IsSupported)
    {
        lblStatus.Text = "Bluetooth not supported";
        lblStatus.Foreground = new SolidColorBrush(Colors.Red);

        btnSearchRover.IsEnabled = false;
    }
    else if (BluetoothRadio.PrimaryRadio.Mode == RadioMode.PowerOff)
    {
        lblStatus.Text = "Bluetooth turned off";
        lblStatus.Foreground = new SolidColorBrush(Colors.Red);

        btnSearchRover.IsEnabled = false;
    }
}
We create an enum called RoverDirection, that has the same meaning of the Gadgeteer counterpart. We then declare two dictionaries that will be used, respectively, to map arrow keys to commands and to store the press status of each key. We declare also two objects to manage Bluetooth connection.
In the class constructor, we initialize the dictionaries, for example specifying that the UP key corresponds to the “A” command, the DOWN key to the “B” command, and so on. We also set the initial press stats of each key.
The next piece of code simply checks if Bluetooth is supported and turned on.
In the btnSearchRover_Click event handler, we create a BackgroundWorker that executes the following code inside the DoWork event (you can refer to the downloadable project available at the end of this article for a complete reference):
private void bwDiscoverRover_DoWork(object sender, DoWorkEventArgs e)
{
    try
    {
        if (bluetoothStream != null)
            bluetoothStream.Close();

        client = new BluetoothClient();
        var gadgeteerDevice = client.DiscoverDevices().Where(d => d.DeviceName == "Gadgeteer")
                                    .FirstOrDefault();
        if (gadgeteerDevice != null)
        {
            client.SetPin(gadgeteerDevice.DeviceAddress, "1234");
            client.Connect(gadgeteerDevice.DeviceAddress, BluetoothService.SerialPort);
            bluetoothStream = client.GetStream();
            e.Result = true;
        }
        else
        {
            e.Result = false;
        }
    }
    catch (Exception)
    {
        e.Result = false;
    }
}
We start creating a BluetoothClient object, contained in the InTheHand.Net.Sockets namespace. Then, we call the DiscoverDevices method, that returns an array of all the devices it finds. As we have called our device Gadgeteer, we use LINQ to search for a device with this name. If we find it, we set the PIN code and use the Connect method to establish a connection. It requires the device address and the Bluetooth service class to use. We must use BluetoothService.SerialPort, that identifies a service that provides a basic serial emulation connect over Bluetooth. Finally, we get the stream that allows us to communicate with the device.
Now, we must handle the PreviewKeyDown and PreviewKeyUp event of the Window to check what key has been pressed and send the corresponding command to the Gadgeteer Rover. Let’s begin with PreviewKeyDown:
private void Window_PreviewKeyDown(object sender, KeyEventArgs e)
{
    e.Handled = true;
    if (!keyCommands.ContainsKey(e.Key))
        return;

    if (!e.IsRepeat)
    {
        keyPressedStatus[e.Key] = true;
        Debug.WriteLine("Key pressed: " + e.Key);

        Image image = null;
        string imageName = null;

        this.CheckImage(e.Key, out image, out imageName);
        this.SetImage(image, string.Format("Images/{0}_pressed.png", imageName));

        switch (e.Key)
        {
            case Key.Up:
                roverDirection = RoverDirection.Ahead;
                break;

            case Key.Down:
                roverDirection = RoverDirection.Back;
                break;

            default:
                break;
        }

        string command = keyCommands[e.Key];
        if (Keyboard.IsKeyDown(Key.Left) && Keyboard.IsKeyDown(Key.Right))
            command = keyCommands[Key.T];

        // Sends command to the Rover.
        this.SendCommand(command);
    }
}

private void SendCommand(string command)
{
    Debug.WriteLine("Sending command: " + command);
    if (bluetoothStream != null)
    {
        var buffer = System.Text.Encoding.Default.GetBytes(command);
        bluetoothStream.Write(buffer, 0, buffer.Length);
    }
}
If a key defined in the keyCommands dictionary has been pressed and it isn’t a repeated key, we update the corresponding keyPressStatus, because now the key is in the pressed state. Then, we call a couple of methods to update the arrow image so that it reflects the new status. You can see the code in the project that comes with this article.
After that, we check the key and, if necessary, we update the roverDirection variable. We extract the command from the dictionary, making a little hack: if left and right key are pressed together, we set the command to keyCommands[Key.T], that corresponds to “R” (Rotate).
Finally, we invoke the SendCommand, that converts the command string to bytes and writes them to the Bluetooth stream, so that they are sent to the device. When the Bluetooth module on Gadgeteer device receives this data, it will change the motor movement as shown earlier.
The PreviewKeyUp event handler is similar:
private void Window_PreviewKeyUp(object sender, KeyEventArgs e)
{
    e.Handled = true;
    if (!keyCommands.ContainsKey(e.Key))
        return;

    keyPressedStatus[e.Key] = false;

    Image image = null;
    string imageName = null;

    this.CheckImage(e.Key, out image, out imageName);
    this.SetImage(image, string.Format("Images/{0}.png", imageName));

    string command = null;
    if (keyPressedStatus.All(k => !k.Value))
    {
        Debug.WriteLine("No key pressed");
        roverDirection = RoverDirection.None;

        // Sets the command to send to Rover.
        command = "S";
    }
    else
    {
        if (e.Key == Key.Left || e.Key == Key.Right)
        {
            // The left or right key have been released, so resend the command to go forward/backword.
            if (roverDirection == RoverDirection.Ahead)
                command = "A";
            else if (roverDirection == RoverDirection.Back)
                command = "B";
        }
    }

    if (!string.IsNullOrEmpty(command))
    {
        // Sends command to Rover.
        this.SendCommand(command);
    }
}
First, we set the keyPressStatus of the pressed key to false. Then, we update again the arrow image and we check if all the keys have been released, because we need to send the stop command to the Rover. Otherwise, we control whether the released key is left or right: it this case, we check the current value of roverDirection and send to the rover the command to restore forward or backward movement, if necessary.
This completes the main part of the WPF application (as said, you can refer to the attached project to see the whole code). Now we have all the pieces to make the Gadgeteer robot move.
Let’s power up the Gadgeteer device and waits for the LED to become green. Windows informs you that a device are trying to make a connection:
Click the popup and enter the PIN code to make the connection. You need to perform this task only the first time.
Now that the Gadgeteer application is up and running, and the Bluetooth module is correctly configured, start the WPF application and click the Search Rover button. If everything works correctly, after a few seconds we should see the Connected to Gadgeteer message near to the status label: now we can press the arrow keys and see the Rover moving:
Both the Gadgeteer and the WPF application are available for download.


#1 by zazkapulsk on May 26, 2012 - 2:52 AM
Wow! This really explained things. Great work.
A quick couple of question:
1. I see both the robot and the WPF application are Bluetooth clients. Is this OK? Why is there no host?
2. Can data be sent from the robot in the same manner?
Thanks!
#2 by Marco Minerva on May 26, 2012 - 3:46 AM
Thank you for your comment!
Yes, it is OK that both robot and WPF application are Bluetooth clients, as long as the Gadgeteer Bluetooth module is discoverable, because both client and host can receive data. In this way, we can make the things simple. For example, we don’t need the Bluetooth module to search for devices and to connect to other modules. The functionalities of Client Mode are sufficient.
On the other hand, if you want to send data from the Robot, you need to use the Send method that is part of client functionalities.
Let me know if you have other questions, I will happy to answer you.
#3 by zazkapulsk on May 26, 2012 - 3:51 AM
Thanks a lot, Marco.
So no host is needed also to send data from the Gadgeteer, great. That answers all my questions.
Would it be possible to post an example for a simple two-way communication between a Gadgeteer and a WPF using the cellular module? I’m lost with that one.
Great work, again.
#4 by prasadbabu on May 29, 2013 - 5:41 AM
i want some information about how to control a robot with mobile throught sms
#5 by Marco Minerva on June 3, 2013 - 1:06 AM
You can start watching the Cellular Radio Module, http://www.ghielectronics.com/catalog/product/322.
#6 by Tania Kline on December 4, 2022 - 7:00 PM
Thiis was great to read